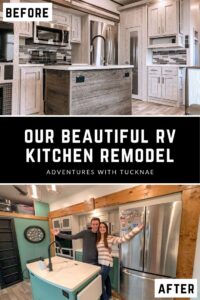
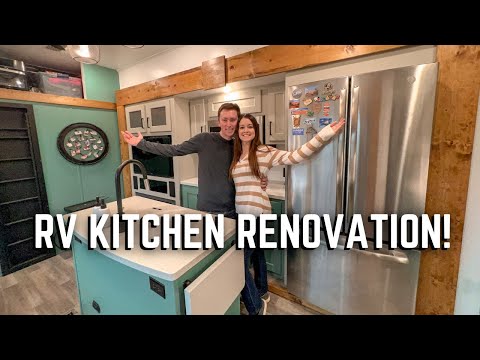
Our RV kitchen remodel was one of our most challenging RV projects so far, but it was worth it! In this post, I will lay out all of the details of our RV kitchen renovation from start to finish.
If you prefer to learn through video, scroll to the end of this post to watch our RV kitchen renovation video on YouTube!
This post may contain affiliate links. As an Amazon Associate, I earn from qualifying purchases. I may receive a small commission when you make a purchase using my links at no extra cost to you. Thank you for your support! Read our Disclaimer Policy for more info.
The plan for our RV kitchen remodel
We tend to put projects off for a long time and then knock them out all at once. Our RV kitchen remodel project was no different.
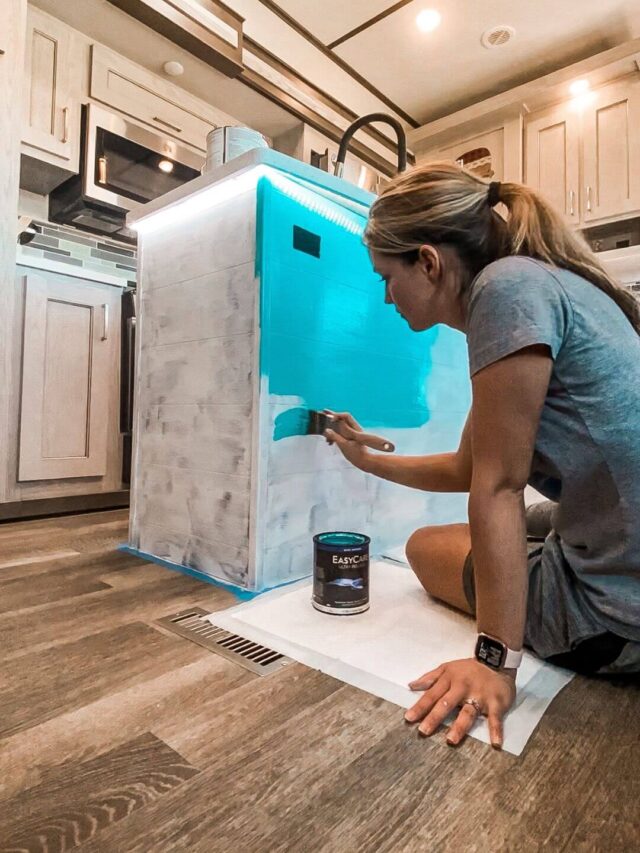
One of the first things I did in this RV was to paint the kitchen island a teal blue color about nine months after we got our new RV. That was the extent of our renovations until twenty months later.
I know…we move slowly on projects, haha! But it’s harder to get projects done when you live full-time in an RV.
To be fair, we did a lot of other projects during that time and were moving around a lot in our travels.
After living with the blue island for quite a while, I decided I wanted to go in a different direction with the color in the kitchen.
Ironically, I found my color inspiration in a very unexpected place. A rain jacket!
We took a trip to Iceland in March of 2022, and I purchased a new rain jacket for the trip. It was a light green color, and I really liked it!
I asked Tucker what he thought of the color for our kitchen, and he was on board as well.
After that, we only had to decide where we wanted the accent colors and what we wanted to do for our remodel.
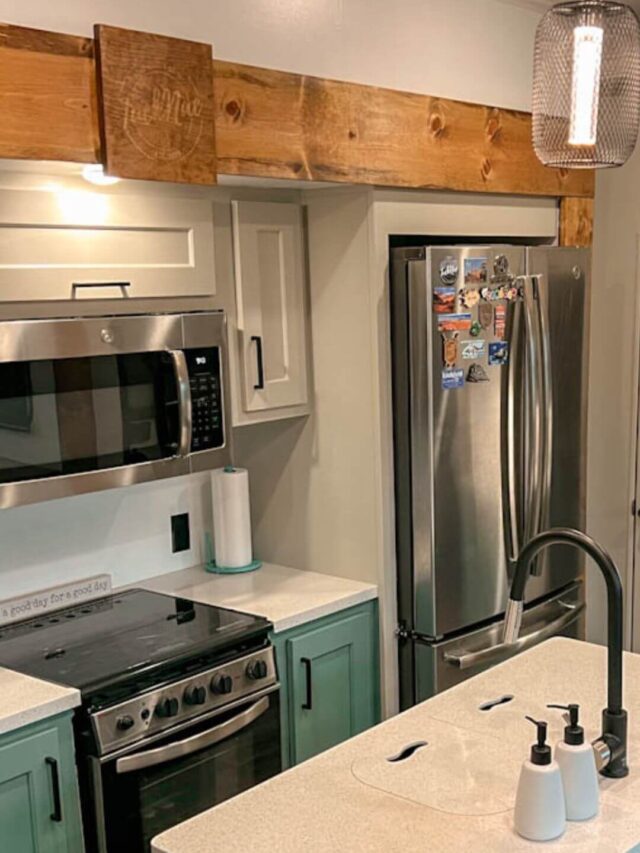
We decided on green for the island and a few of the lower cabinets and a light grey for the upper cabinets. The walls and ceiling were painted white.
We also planned to replace the backsplash, countertops, and slide trim on both slides.

Materials and tools we used for our RV kitchen remodel
We used several materials and tools during our RV kitchen remodel. We could have gotten by without some of the tools, but they made the process much easier.
Here is a list of most of the items we used during our fifth-wheel renovation process.
Materials used
- Paint brushes, rollers, and trays
- Plastic sheeting
- Spray paint
- Valspar interior satin paint
- Kilz oil-based primer
- Snack baggies
- Painter’s tape
- Wood putty
- Brad nails
- Finish nails
- Miniwax Stain
- Stain pads
- Extreme Strength caulk
- Cleaning buckets
Tools used
- Orbital sander
- Chop saw
- Table saw
- Jig saw
- Cordless drill
- Impact driver
- Prybar
- Caulk gun
- Brad nailer
- Finish nailer
- Tape measure
- Hammer
- Saw horses

Demo and prep work for our RV kitchen remodel
I’ll be honest; the demo and prep work took us way longer than I thought it would. You just don’t think of so many little things in advance!
Prep work
The first thing that we did was remove the old slide trim. It honestly wasn’t very difficult to do.
We used a prybar and popped it right off. (Don’t forget to remove the old wood glue and nails as well!)
Next, we removed all of the cabinet doors and hardware. This was a bit more tedious, making sure we kept everything well organized and didn’t lose any small parts.
💡Pro Tip: When removing hardware, organize it in small baggies with sticky notes inside of each bag to remind you what goes where. Your post-renovation self will thank you!
The next thing we did was remove the backsplash above the coffee bar and behind the stovetop.
Once again, this was pretty easy. We used a prybar to start it, and it peeled right off.
After that, we took a large roll of construction plastic and cut it into large sections to cover the floor and the entirety of the living room slide contents, and we put plastic in the cabinets to protect the contents from getting messed up.
Sanding & cleaning
Once we removed everything and covered what we needed in plastic, it was time to get down to the more difficult task of sanding everything.
Sanding is an important task that is, to be quite frank, a huge pain to deal with! No one enjoys it, and often people try to get away without sanding at all, but that just leads to bigger issues down the road.
As annoying as it is, please don’t skip this important step.
You will need to sand whether you have real wood or particle board RV cabinets. Sanding is a lot of work, but it makes a huge impact and is essential for a successful RV makeover.
We chose to sand the RV kitchen cabinets and the island. This included the outside of the cabinets, the cabinet openings, and all of the cabinet doors that we had removed.
We did not sand the RV walls and don’t recommend that you do either.
Tucker went over everything with 180-grit sandpaper first, followed by a second round of sanding with 220-grit sandpaper to finish it.
After the sanding was complete, we let everything settle for a bit, and then it was my turn to clean everything up.
I like to use two cleaning buckets. One with hot water and vinegar mixed in, and one that is just plain hot water.
As I’m cleaning, I go over everything twice. First with the vinegar mixture and secondly with the plain water.
This ensures that I don’t miss anything and prevents me from smearing dirt and dust from place to place with the same dirty rag.
Taping
The final thing we did to prep for our RV kitchen remodel project was taping everything off.
This is a time-consuming and tedious task, but it’s a very important one.
I tapped around the floor (where there wasn’t plastic), around our kitchen appliances, over electric outlets, and basically everything else that I wanted to avoid accidentally getting paint on as well.

Priming, painting, and caulking during our RV kitchen remodel
After all of the demo and prep work was done, it was time to get to the fun part…paint and primer!
The best way to improve the interior of your RV is to paint it. Painting in an RV makes such a huge difference, especially on dark wood RV cabinets!
Some people like to use a paint sprayer for their RV renovations, but we didn’t have one and chose not to invest in one for this project.
Instead, we used a combination of paintbrushes and paint rollers.
Priming
I like to use Kilz oil-based primer and have used it throughout our RV in our renovations.
It’s one of the best primers I’ve found, and I highly recommend it if you don’t have another one in mind already.
Priming everything took me about seven hours from start to finish. It was so much work!
I did one coat of primer on the walls, ceiling, and cabinets and two coats of primer on the island since it had an existing color that I didn’t want to show through at all.
I used a roller to apply primer on the walls and larger areas and a brush to apply primer on the cabinets and more tedious places.
This included the cabinet doors and pantry door, which I painted and primed outside.
💡Pro Tip: Kilz primer needs to dry for one hour before applying paint on top of it, but obviously, that wasn’t something I had to worry about since it took me seven hours to get all of the primer on. If you are just painting a small amount, make sure to wait an hour before applying your paint.

Painting
After finishing the primer, I started on the painting. I used Valspar’s signature white paint for the walls and the same paint tinted with color for the cabinets.
I decided to start with the white walls first so I wouldn’t accidentally get any white paint off-spray from the roller on the cabinets after they were painted.
I did two coats of white on the walls and ceiling and followed that with a third coat of just touch-ups in places where it was needed.
Once the white walls were all done, I started on the cabinets with grey and green paint colors.
As I mentioned before, we did a light grey/tan color on most of the cabinets and a green accent color on the island and some of the lower cabinet fronts.
We also painted the entire wall below our attic space green, and I love that we did so! The extra pop of color from the accent wall ties everything together perfectly.
I did two coats of paint color for both the green and gray on the cabinets, cabinet fronts, and island. Once again, I used a mix of rollers and brushes depending on the size of the area I was painting.
The painting took me a total of about 14 hours from start to finish.
We also used Krylon paint + primer combo spray paint to paint all of the cabinet door handles black.
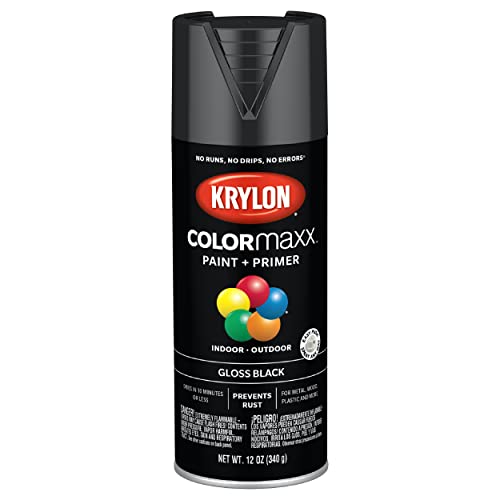
For that process, Tucker lightly sanded each handle and then spray-painted them with an all-in-one paint and primer.
Between the updated cabinets and painted hardware, our finished product looked as good as new cabinets would!

Caulking
After all of the painting was done, Tucker caulked everything. This gave it a clean, finished look.
He caulked the ceiling trim, wall trim, where the cabinets and walls met, and the cracks between cabinets. Basically, it was anything that needed caulk to help finish it out.
We used a special kind of caulk called Extreme Stretch, specifically designed to stretch more than regular caulk to prevent cracking. Which is exactly what you need/want in an RV as it moves so often.

Completing our RV kitchen remodel
After the painting was finished, it was time to do all the finishing work.
Putting everything back together
First, we removed all the painting tape and plastic and discarded them. It’s such a satisfying process!
We continued by putting all of the hardware back on the cabinets and cabinet doors. This step was made so much easier because of how well we organized things when we took them apart.
After installing the hardware, we put all the cabinet doors and the pantry door back where they belonged.
Finally, we cut, stained, sealed, and hung all of the slide trim, including a custom centerpiece we etched with our logo.
We wrote a detailed blog post showing the step-by-step process for replacing RV slide trim, which you can read next!

Future additions we might add to our camper kitchen remodel
While this was the majority of the renovations we have planned for our RV kitchen, we might still do a few more projects in the future.
Adding butcher block countertops
This is a big one for me that I’ve gone back and forth on a few times. I absolutely love the look of butcher block countertops in an RV, and exchanging them for our existing countertops would take the kitchen to the next level.
However, several things to consider about butcher block countertops have kept me from doing them so far.
I’ve had several RVers warn me that they are very hard to take care of and stain quite easily. We have yet to make a final decision, so time will tell what we ultimately do.
If we add a new countertop, I will likely choose one longer than the current countertop to extend our counter space.
Adding a backsplash
One thing I do want to add for sure is a backsplash behind the stovetop. I am waiting to find the perfect pattern, and then I will install it. Once I do, I will be sure to update this post.
Replacing the microwave with open shelving
This is something I’ve been considering as well. I love the look and concept of open shelving. However, we do use our microwave a fair amount.
We would also have to take into consideration that anything on the open shelves would have to be stored safely away somewhere else in the RV during travel days.

Replacing the factory-installed light fixtures
While our original light fixtures really aren’t too terrible, I don’t love them. My least favorite is the hanging pendants above the RV kitchen sink.
They don’t have real light bulbs in them, which is a plus for a mobile RV, but they just don’t look great, in my opinion.
If we make updates to the lighting situation, I will share them here.
Final thoughts and things we learned from our RV kitchen remodel
If you’re trying to decide whether or not to do an RV kitchen remodel, let me encourage you to go for it!
Don’t get me wrong, it is a lot of hard work, but the end result is totally worth it!
Here are a few lessons we learned during this process.
Give yourself more time than you think you’ll need
Doing an RV kitchen makeover on an extremely tight timeline is not the best idea. Often, things will go wrong or take more time than you might have anticipated.
Give yourself plenty of extra time to complete a renovation, especially if it is extensive.
I had hoped to have our tiny kitchen renovation done in five or six days, and it ended up taking almost two weeks due to weather delays and missing materials.
You can also do things in small bits. We changed our RV table long before we did anything else.
Leave extra room in your RV renovation budget
Going hand-in-hand with our last tip, things will probably cost more than you originally thought they would. Renovations are not cheap, and material costs add up quickly.
Make a detailed list of everything you think you will need, then look up your local prices. After you have your rough budget cost, add in some wiggle room for the extra things that are bound to come up.

Plan on doing your RV renovations near a major home improvement store
Trust me…unless you have the magical gift of seamless renovations, you are going to find yourself running to the hardware store a few times during this process.
Renovating your RV in a remote location, an hour away from the nearest town, might not be the best idea. We were 30 minutes away, and even that was a stretch.
Doing your renovations near a major store like Lowe’s or Home Depot is going to save you both time and fuel money.
You don’t have to change everything in your travel trailer kitchen remodel
Not everything in our RV kitchen needed to be replaced or changed. We decided to keep our original stainless steel sink and our kitchen faucet. I love my kitchen sink! Eventually, we may replace the sink faucet, but it works just fine for now.
Make sure you have plenty of ventilation
When working in a small space (like an RV) with toxic fumes from primer and paint, it’s important to ensure your area is well-ventilated.
If the weather is nice and wouldn’t interfere with the paint drying or adhering correctly, I recommend leaving some windows and your door open during the priming and painting process.
Watch Our 5th Wheel RV Kitchen Remodel YouTube Video
In Closing: Our 5th Wheel RV Kitchen Remodel
I hope you enjoyed this post and found it helpful. What do you think of our RV kitchen remodel? I love the beautiful colors, and the finished product is one of my favorite things about our RV.
Looking for more beautiful kitchen renovations and RV remodeling ideas like this? Check out the links below for camper kitchen remodel ideas and RV kitchen organization ideas!
Find More RV Renovations & Inspiration:
- 21 Beautiful RV Kitchen Renovations & Ideas
- 21 Stunning RV Renovations & Amazing RV Remodel Ideas
- 21 Gorgeous RV Bedroom Makeovers & Cozy Remodel Ideas
- 21 Colorful RV Renovations
- 23 Cozy RV Bunk Room Ideas For Renovating & Decorating
- 26 RV Bathroom Renovations and Remodel Ideas
- 21 Beautiful RV Wallpaper Ideas for DIY Camper Renovations
- 20+ RV Office Setup Ideas for Digital Nomads
Find More RV Decorating Ideas & Tips:
Happy travels!

Click here to save this post on Pinterest!